• Skip to primary navigation
  • Skip to main content
  • Skip to primary sidebar

Jackie Van Nice

E-Learning Goodness by Jackie Van Nice

  • Home
  • About
  • Blog
  • Portfolio
    • Articulate’s ELH Challenges
    • Sales Mobility Software
    • Product Sales
    • Sexual Harassment
    • Code of Conduct
  • Freebies
    • Free Storyline Templates
    • Free PowerPoint Templates
    • Free Images
    • Freelancing Tips
    • Free Resources to Help Get Started in eLearning
  • Work With Me
  • Contact

Working for Yourself

My Multidimensional (Yet Flat) Desk

September 17, 2014 By Jackie Van Nice 16 Comments

Select Image to Launch Demo

Select Image to Launch Demo

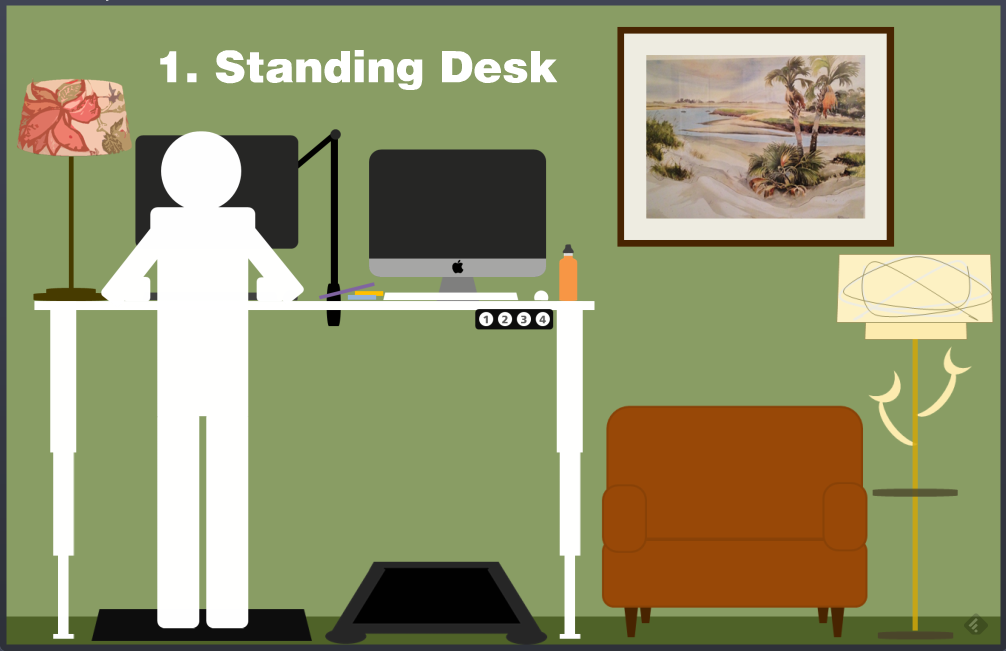
This week’s Articulate challenge is to render your work space in simple flat-style images.

Oddly enough, it coincides with my move from a standard desk to a standing/walking/kneeling/sitting desk, so that’s what I illustrated in my entry.

The Problem and The Solution

I’d never seriously thought about doing this before, but I happened to glimpse an article on Facebook that was talking about standing desks. (Here’s the article. It has lots of good info including both high-end and very simple, inexpensive options.)

If you know me even a little bit, you’ve gathered I spend an insane amount of ’round-the-clock time at my desk. Leaving the house to move involves a 40 to 60 minute round-trip drive (more sitting) to go somewhere I can bike, take a walk, or go to a gym. When you’re in the middle of work you love, that’s a big disincentive to take a break.
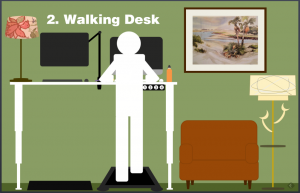
The Walking Desk

The Walking Desk

When I lived in Chicago and Portland I could roll out my front door every day and walk for miles or go to a nearby gym. In Europe I’d go for walks or run errands on foot every day and it was fantastic. Where I am now makes me insane and my body is going to stop speaking to me completely if I don’t do something.

So the standing desk idea resonated with me, and once I delved into the topic I realized that making it into a walking desk (plus a kneeling desk), and a sitting desk were just what the doctor would order if I made it to the doctor before I gave out completely.

The Images and Interaction

The Kneeling Desk

The Kneeling Desk

Some of the pieces and parts of my new setup are still in transit, so I rendered the scene as I expect it to be. Much of it is already in place, so those things are pretty spot-on.

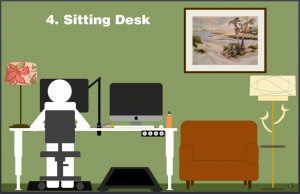
Since the whole scheme hinges on the desk raising and lowering to specific heights, that’s what I focused on in the interaction. I put in a flat person to illustrate, but also animate them out so you can just see the room. All you do to morph the desk is push a button to move it to a preset height, so that’s what I have the user do in the demo. It’s quick and simple to illustrate the concept.

Try It! (+ My Setup Details)

Select Image to Launch Demo

Select Image to Launch Demo

Here’s the quick interaction if you’d like to see it. Also, since some people have asked for the details of my setup, I’ve shared them below.

Desk: I chose the UpLiftDesk 900, 80″ wide – enough to accommodate both a treadmill and sitting/standing station below; though 72″ wide might be enough. Unlike other desks, you can decide when you put it together how far apart you want the legs. I chose the white top and white base to go with my other office furniture.

This desk had good reviews for its smooth lift motors, which are housed inside of the legs, and sturdiness. I believe there are four presets you can customize for different heights.

I didn’t choose to go with a keyboard tray for now, but if you want one on a regular full-sized slide you can get the 920 desk model instead. I thought the 900 might be a bit sturdier and knew I could use a half-track keyboard tray with it if I really wanted to.

I also chose the 12-year extended warranty. The last thing I want to figure out 10 years from now is where and how to get the motors in my desk legs repaired!

Treadmill: I chose the LifeSpan TR1200-DT3 Under Desk Treadmill. Seems to be the go-to choice. Several desk companies, including UpLiftDesk, sell this same treadmill for the same price if you want to buy from them – but all of the advice I found said to order from LifeSpan directly for ease of dealing with any warranty issues, etc. I went with the extended warranty on this, too.

Standing/Sitting Mat: I chose the UpLift Sit-Stand Desk Mat (an option you can choose when you order the desk) in the 3′ x 5′ size so it’s large enough to place a chair on it.

Monitor Arm: Since you want your monitors to swing to whichever side of the desk you’re working on you probably want them on arms like this. I went with the UpLift Single Monitor Arm (an option you can choose when you order the desk) for my regular monitor, but I’m hesitant to be swinging my iMac around on an arm! (Plus I’d have to find one that fits.) It’s just as easy for me to slide the iMac over from one side to the other, so that’s my plan for now.

Kneeling Chair: I already have the Jobri Jazzy Kneeling Chair; though I got it a few years ago and offhand don’t remember who I ordered it from. I like switching off between it and my regular office chair.

Regular Office Chair: I’ll give a shout-out to my chair since I’ve used it incessantly for an unbelievable 17 years now. It’s put up with lots of grief and it’s still a complete champ. I believe it’s Via’s Terra Low-Back chair. I bought it at a furniture store in Portland and they let me customize the fabric.

More Info & Videos: I think that’s it for my setup – but the UpLift site has some nice videos to give you a better look at how all of this works together, plus a whole lot more.

Let me know if you decide to revamp your desk in a similar way. I’d love to hear about it!

Filed Under: E-Learning, Working for Yourself Tagged With: Articulate Storyline, Community, E-Learning Design, ELHChallenge, Freelancing, Professional Development, Show Your Work, Visual Design

Show Your Work: Creating Portfolio Images to Share

August 10, 2014 By Jackie Van Nice 4 Comments

This week’s Articulate challenge is about creating images to showcase your work. After going through the process of producing new work it’s tempting to just move on, but creating shareable images helps build a more visual portfolio and show your peers what you’ve been up to, too.

Main Portfolio Image

First, David Anderson wanted us to create a main portfolio image he could use to link from the challenge to our online portfolios.

Since my website pretty much says it all (who I am, what I do, and what my work looks like), I adapted the basic layout of my site and captures of my work into an image David could use. I also like the idea that anyone clicking on the image will land on exactly what they’d expect to see. Truth in advertising.

Jackie Van Nice Portfolio

Portfolio Image for the Challenge: Look familiar?

Use this free template! I shared the template I used to create this image with another community member, and they found it so useful I thought I’d offer it as a free download. It’s in PowerPoint, and you’re welcome to grab it right here.

Images for Social Media

The next step was to create the same type of image to share on Twitter, Facebook, and Pinterest. Since each handles images differently, the challenge is to try to get your image to display as you’d like it to. The images I shared on those sites are below.

This will be an ongoing challenge. Between the ever-changing demos I create and the ever-changing sites to share them on, this can only be a work in progress. But the value of figuring it out and doing it well is enormous. Thanks for the challenge, David!

Portfolio Image Posted to Facebook

Portfolio Image Posted to Facebook

Portfolio Image Posted to Twitter

Portfolio Image Posted to Twitter

Portfolio Image I Pinned on Pinterest

Portfolio Image I Pinned on Pinterest

Filed Under: Working for Yourself Tagged With: Community, E-Learning Design, ELHChallenge, Free Download, Freelancing, Portfolio, PowerPoint, Professional Development, Show Your Work, Visual Design

Can You Crowdsource Your Mentors?

June 7, 2014 By Jackie Van Nice 8 Comments

Crowdsourced Mentoring

I’ve always loved nudging people to figure out their goals and dreams; encouraging them to make it all happen. I’m sure you’ve done the same. There’s nothing more exhilarating than seeing someone connect with that spark that ignites their work and life. So when I recently started getting requests to mentor people who have seen my work here, you can imagine how excited and humbled I was that they would ask.

What Makes A Good Mentor?

The good news for me is that this has been a fantastic year. By looking up from my desk long enough to reach out to share and connect with others, all sorts of career possibilities suddenly exploded for me. But all of that good stuff also means my free time has sort of evaporated. Given that, I’m trying to figure out what sort of help I’d be able to offer, and it got me thinking about what and how I learned from my own mentor.

My Mentor

When I started as a freelance instructional designer my first client ended up becoming a fantastic mentor just by being who she is. There was no official mentoring relationship – I just took it all in. This is how she helped me:

  • Reviews & Critiques: Every time she reviewed my work and made it clear that, for example, the placement of every element was important down to the very last pixel – I took it in and that became my standard.
  • Observation: From project management to design work to professional involvement, just by observing how she operated, I learned.
  • Encouragement & Support: She thought I was talented, but more than that she told me I was and always made sure I was paid as much as possible. She didn’t have to do either of those things, but her generosity and support made me work even harder to do the best work I possibly could.

Individual vs. Crowdsourced Mentoring

A lot of the things I got from her individually can be obtained in professional communities online now. It’s not identical, but I’ve grown enormously in the past few years by taking advantage of the knowledge, advice, and opportunities for growth provided by the generous members of the Articulate community. Need a review or critique? Want to observe how others work and what they do? Need encouragement, suggestions, or advice? Want quick and effective ways to build your skills and portfolio? It’s all there in the community, and those are the same things I got from my own mentor.

Can you really crowdsource something like mentoring? Check out the thoughts of Danielle Russell. Her “crowd” is her network of connections – and she’s doing what we’re all doing: Getting involved, gathering information, making decisions, and taking action to build her career.

What Are You Looking For In A Mentor?

If you were looking for an individual e-learning mentor, what would be most helpful and what would that relationship look like? Could turning to an involved professional community for support meet any of those same needs? What do you think?

Filed Under: Working for Yourself Tagged With: Community, E-Learning Design, Freelancing, Professional Development

Step Graphics to Success as an E-Learning Designer

May 30, 2014 By Jackie Van Nice 19 Comments

Select Image to Launch Demo

Select Image to Launch Demo

This week’s challenge was to create a step graphic to tell a story or explain a process. It came at the end of a week where I kept hearing concerns from e-learning designers who felt stuck due to lack of skills, experience, usable portfolio pieces, visibility in the field, and/or confidence. So when the challenge hit, that was my topic.

Step Graphic Main Screen

Step Graphic Main Screen

Design

I wanted it to be fresh, direct, and maybe a bit inspiring – so I chose the character, the approach, and the background based on that.

The layout bothered me for a full week. Still does, but I have to let it go. I tried countless ideas with different graphics, colors, fonts, animations, and audio. It started out with more depth (links to resources, etc.) but it was taking too long, so I stripped it down and kept it simple. My concern was keeping the user’s attention focused on an already-busy screen. It seems to work, based on the little bit of user testing I did, so I’m going with it.

The step navigation is simple. I chose buttons with a full set of states, including a clear selected state so it’s easy to see where you are.

Content

I added the intro screen to make it clear that you should probably be (a) an e-learning designer who (b) has these goals, if the content is going to apply to you.

After that, it’s what I do each week for the challenges combined with a little bit of advice based on personal experience.

The Result

Ready to give it a try? Take a look! And if you’re an e-learning designer who feels stuck or wants to learn more and improve your skills, you might want to give the challenges a try. They’ve worked for me!

Select Image to Launch Demo

Select Image to Launch Demo

Filed Under: E-Learning, Working for Yourself Tagged With: Articulate Storyline, Characters, Community, E-Learning Design, ELHChallenge, Freelancing, Instructional Design, Portfolio, Professional Development

4 Free E-Learning Tools I Use

May 22, 2014 By Jackie Van Nice Leave a Comment

Note: The sands of time move on, as do the free tools I use. See the updated version of this post here!

This week’s Articulate challenge is to share the free e-learning tools we really use. These are my favorites.


Redbooth

1. Redbooth: Project Management

This makes my life so easy it has to be first. Redbooth from Google makes project management effortless, and it’s free up to 5 projects and 5 users. I use it to:

  • Work Across Platforms: I use it on PC, Mac, iPhone, and iPad. It syncs effortlessly and tasks are immediately on my calendar.
  • Manage From Anywhere: I assign tasks, get feedback from team members, write up project notes, and participate in team conversations wherever I am.
  • Easily Manage & Share Files: I store and track all pieces and parts of a project – including email, notes, and conversations – plus sync files automatically with Dropbox. Nothing gets lost.

A “Free” Thought: I started on the free version to test it, then went to the paid one. Get creative and you could stretch those 5 projects and 5 users a whole lot farther.


I Used Microsoft Clipart For This

I Used Microsoft Clipart For This

2. Microsoft Clipart: Images

Crazy, right? Sounds like the ’50s or something. There are a million other places to get images. Why is Microsoft Clipart still my first stop?

  • License & Attribution Issues: I REALLY can’t stand checking every license on every image and deciding whether it’s worth using and if there should be an attribution, and if so where do I work it in?
  • Editable/Flexible Images: I start with an image and think of ways to use it so it doesn’t look like everyone else’s. People loved the images in this piece, and they’re from MS Clipart. With an open mind and creative eye you’ll be amazed at what you can do.
  • Click & Play in PowerPoint: Since it’s integrated into PowerPoint, my quick image editor of choice, I can speedily bring in a pile of images and play around to see what works. Even if I get my final images elsewhere, it’s a great playground.

Pinterest

Pinterest Board

3. Pinterest: Inspiration & Project Organization

I haven’t been using it long, but already rely on it for a couple of things:

  • Graphic Inspiration: When I see something that resonates with me, I pin it in my Graphic Inspiration board. That’s where I went to design my interactive resume.
  • Project Organization: Now that you can have lots of “secret” boards I tend to create one for each new client project and use it as a catch-all place for everything from graphic and technical ideas to instructional design approaches. It’s secret, so I can include company-specific links and info.

dafont font squirrel

4. Dafont & Font Squirrel: Fonts

These free font sites are so quick and easy to use, they’re hard to resist. I use them for:

  • Typographic Inspiration: Even if I don’t end up using one of theirs, browsing gives me ideas.
  • New Font Fun: I’ll often use them in the weekly Articulate challenges. They’re great to try out and see what’s possible.

What's in Your Course Design Toolkit?

What’s in Your Course Design Toolkit?

Check Out Many More!

Those are my current go-tos you can get for free.

There are tons more you can use, and many are being shared in the comments section of this week’s challenge. I’ll be using ideas from there, and you may find some new freebies you love, too.

Filed Under: E-Learning, Working for Yourself Tagged With: Community, ELHChallenge, Freelancing, Instructional Design, Professional Development, Show Your Work, Visual Design

  • « Go to Previous Page
  • Go to page 1
  • Go to page 2
  • Go to page 3
  • Go to page 4
  • Go to Next Page »

Primary Sidebar

Welcome!

I’m an award-winning instructional designer and proud Articulate Super Hero who creates e-learning for large organizations. I blog to explain my design process, share tips and tricks, and help others succeed. I hope you enjoy my refreshing gallery of e-learning goodness!

  • View jackietrains’s profile on Instagram
  • View jackievannice’s profile on LinkedIn

Tags

Articulate 360 Articulate Rise Articulate Storyline Articulate Studio Audio Avatars CCAF Characters Community Context Design Makeover Dials Drag & Drop E-Learning Design ELHChallenge Emotional Engagement Free Download Freelancing Games German Glossary Instructional Design Languages Makeover Menu Mobile Motivation Pantone Portfolio PowerPoint Professional Development Quick Reference Quizzes Sales Training Scenarios Show Your Work Software Training Storyline 360 Tables Technical Training Templates Typography Video Visual Design Voiceover

Top Posts & Pages

  • Portfolio
    Portfolio
  • Home
    Home
  • Sexual Harassment Training
    Sexual Harassment Training
  • Sales Mobility Software Training
    Sales Mobility Software Training
  • Navigating a Tasty Circular Menu
    Navigating a Tasty Circular Menu
  • Articulate's E-Learning Heroes Challenges
    Articulate's E-Learning Heroes Challenges
  • About
    About
  • Free Visual Storyboard Template
    Free Visual Storyboard Template
  • Free Storyline Templates
    Free Storyline Templates
  • How to Go Full-Screen & Lose the Player in Storyline
    How to Go Full-Screen & Lose the Player in Storyline

Copyright © 2026 Jackie Van Nice and E-Learning Goodness by Jackie Van Nice